Installation
Table of contents
Step 0. Grant permissions for Python to have rootless access to the HCI interface
This is usually only needed for alternative installations of Home Assistant that only install Home Assistant core. Also, for alternative installations, please note that Bluetooth has to work on your system and has to be accessible for Home Assistant.
-
to grant access:
sudo setcap 'cap_net_raw,cap_net_admin+eip' `readlink -f \`which python3\`` -
to verify:
sudo getcap `readlink -f \`which python3\``
*In case you get a PermissionError, check the Frequently Asked Questions (FAQ) page.
Step 1. Install the custom integration
The easiest way to install the BLE Monitor integration is with HACS. First install HACS if you don’t have it yet. After installation you can find this integration in the HACS store under integrations.
Alternatively, you can install it manually. Just copy paste the content of the ble_monitor/custom_components folder in your config/custom_components directory. As example, you will get the sensor.py file in the following path: /config/custom_components/ble_monitor/sensor.py. The disadvantage of a manual installation is that you won’t be notified about updates.
Step 2. Add your Xiaomi sensors to the MiHome app if you haven’t already
This step is only needed for Xiaomi ecosystem sensors. Many Xiaomi sensors do not broadcast BLE advertisements containing useful data until they have gone through the “pairing” process in the MiHome app. The encryption key is also (re)set when adding the sensor to the MiHome app, so do this first. Some sensors also support alternative ATC firmware, which doesn’t need to be paired to MiHome.
Step 3. Configure the integration
There are two ways to configure the integration and your devices (sensors), in the User Interface (UI) or in your YAML configuration file. Choose one method, you can’t use both ways at the same time. You are able to switch from one to the other, at any time.
Step 3a. Configuration in the User Interface
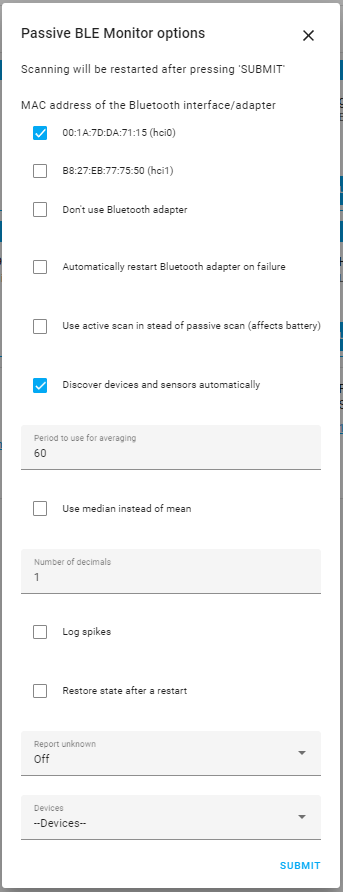
Make sure you restart Home Assistant after the installation in HACS. After the restart, go to Settings in the side menu in Home Assistant and select Devices and services. Next, go to the Integrations tab. Click on Add Integration in the bottom right corner and search for Passive BLE Monitor to install. This will open the configuration menu with the default settings. The options are explained in the configuration parameters section below and can also be changed later in the options menu. Depending on the sensor, the sensors should be added to your Home Assistant automatically within a few seconds till 10 minutes.
Step 3b. Configuration in YAML
Alternatively, you can add the configuration in configuration.yaml as explained below. The options are the same as in the UI and are explained in the configuration parameters section below. After adding your initial configuration to your YAML file, or applying a configuration change in YAML, a restart is required to load the new configuration. Depending on the sensor, the sensors should be added to your Home Assistant automatically within a few seconds till 10 minutes.
An example of configuration.yaml with the minimum configuration is:
ble_monitor:
An example of configuration.yaml with all optional parameters is:
ble_monitor:
  bt_interface: '04:B1:38:2C:84:2B'
  bt_auto_restart: False
  active_scan: False
  discovery: True
  period: 60
  use_median: False
  decimals: 1
  log_spikes: False
  restore_state: False
  report_unknown: False
  devices:
    # sensor
    - mac: 'A4:C1:38:2F:86:6C'
      name: 'Livingroom'
      encryption_key: '217C568CF5D22808DA20181502D84C1B'
      temperature_unit: C
      decimals: 2
      use_median: False
      restore_state: default
      report_unknown: False
    - mac: 'C4:3C:4D:6B:4F:F3'
      name: 'Bedroom'
      temperature_unit: F
    - mac: 'B4:7C:8D:6D:4C:D3'
      reset_timer: 35
    # device tracker
    - mac: 'D4:3C:2D:4A:3C:D5'
      track_device: True
      tracker_scan_interval: 20
      consider_home: 180
    # ibeacon
    - uuid: 'e2c56db5-dffb-48d2-b060-d0f5a71096e0'
      track_device: True
      tracker_scan_interval: 20
      consider_home: 180
Note: The encryption_key parameter is only needed for sensors, for which it is pointed that their messages are encrypted.